A D.I.Y Cargo bike on the cheap.
I'm currently living overseas as my partner is on a work contract for the next while and I find myself with some time on my hands. I've always been interested in living a less car centric lifestyle, and love riding bikes... so it wasn't long before I started looking at Cargo bikes, particularly the 2 wheel bakfiets/long john style ones. No kids for us yet but potentially in the future, and based in Canberra so have lots of great infrastructure to make bike riding a feasible alternative to car use.
The issue is that they are damn expensive in Australia, and non existent where i'm currently based. The few that I have seen/ridden in Australia depart so far from regular bike riding experience (mainly weird geometry) that they are actually not enjoyable machines to use. I can't remember the model of the one I borrowed from my brother's neighbor in Newcastle but the super low bottom bracket made pedal strikes a significant issue when turning on a street with a gentle camber and the steering just seemed 'off'.
The goal at the outset of this project was to make an affordable 2 wheel cargo bike using limited resources that both I and my partner can ride (she is a shorty at 155cm or so). I want to maintain fun/efficient bike riding geometry, have space for 2/3 kids if needed, wide tyre capability for gravel/dirt touring/commuting, hydraulic disc brakes, sturdy kickstand, all while maintaining a sensible weight.
|
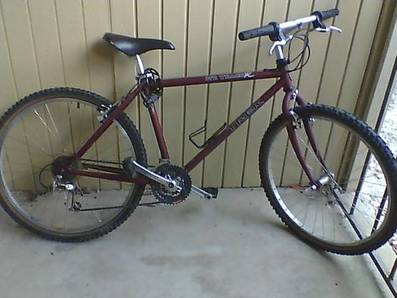
Options for donor bikes were limited in town, but stumbled on a small size mid 1990s Trek Mountain Trek 850 for $80. Fully rigid with 4130 Cromo (steel) tubing with a good stand-over height for my partner. I have to admit I have a soft spot for this model of bike (I rode a medium sized one across Asia for 13,000km in 9 months a few years ago.
With the donor bike sorted I had to find new steel to make the rest of the machine! No Cromo available here...no fancy cold drawn tubing... I had to settle for regular seam welded construction steel (1.6/2.0mm wall thickness) or the project would never get off the ground. |
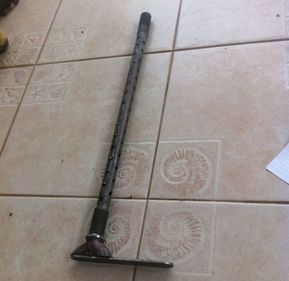
Design wise I was taking inspiration from Bullit bikes, CETMA cargo bikes, Metrofeits, and kind of synthesized the elements I liked. However, because I needed this to be a simple frame build, my cargo frame design varied a bit from the regular manufacturers. My central cargo pole is the main load bearing element, and the cargo bay is just for stabilizing the load. So my main cargo boom is chunky, with the rest being lighter 22mm gal steel tubing. Both the Bullit and the CETMA use smaller gauge tubing but make the cargo hold a structural element of the front end of the bike.
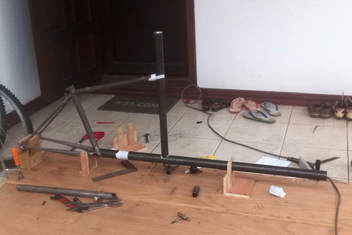
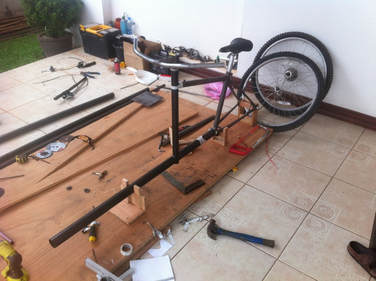
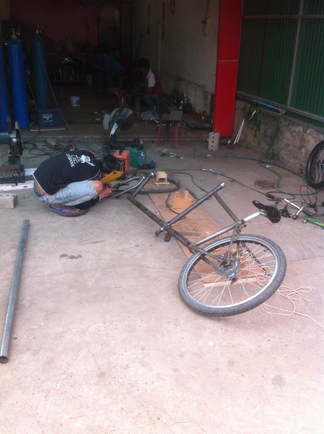
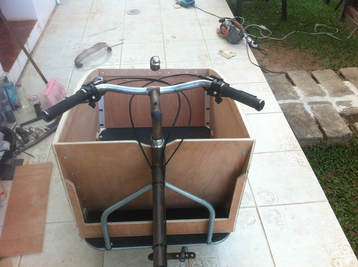
Things ground to a halt as I couldn't find a 20" BMX style bike to use for the front end. Luckily my parents decided to come visit at Christmas so I used them as parts mules to bring over a cheap BMX fork, rim, some hydraulic disk brakes and a few other goodies. Pretty soon the front end was all mitered up and ready for welding. After all the work getting to this point I was pretty nervous about the welding step. Most of the welding I have seen here has been pretty gnarly stick welding done by kids in flip flops with no eye protection. Luckily I found a Vietnamese run place that has a few TIG machines that make fancy stainless steel gates for the nuvo-riche in town. It took a while for them to warm to the idea of doing such a small project but they eventually got on board. I took a string line, my jig and some straight edges along to the shop to help ensure that everything ended up nice and straight. I made disc brake tabs out of some 4mm plate steel and made a rear brace to help spread braking load across the chain stays and seat stays. The front fork is a beefy bmx one so no extra re-enforcement was used for the disc brakes. It turns out the trickiest part of the whole build was getting the Geometry right for the steerer rod, and figuring out how the kickstand fits in around it all. 
|
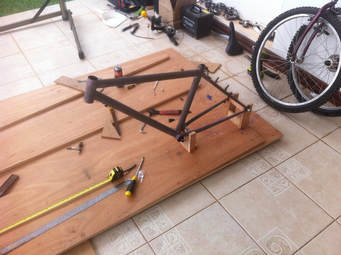
I wanted to preserve the traditional handing of the bike so took some good measurements of it before working on it. I made a jig out of left-over 18mm ply and made spacers that would hold the bike and maintain the rear axle-Bottom Bracket drop/ seat tube angle. After stripping all the paint off it was time to get cutting. First to go was the head tube, then down tube. The cargo boom was shaped to fit the bottom bracket, seat tube junction, then the top tube mitered to fit new vertical steerer. The steerer was then punched through cargo boom.
|

|
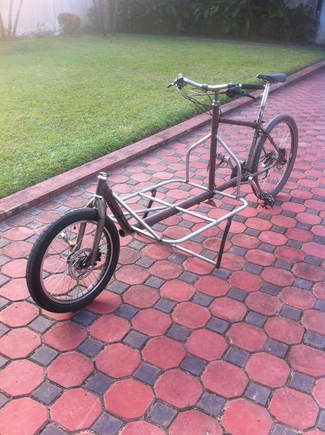
Once the frame was complete and ride-able it was time to figure out the cargo area. I used some 9mm ply painted with a hard wearing textured paint and Hurricane nuts to attach it to the cargo bay to act as a base. I picked up some nice pelican case (music style) clips and decided to use them as the basis for attaching things to the bike. This works out great- anything I want to attach to the the bike in the future I just ensure has the same clip pattern and it can latch in to the fixing points welded on the frame.
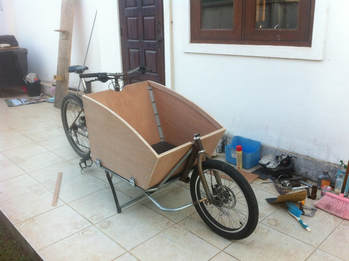
I used 9mm plywood with Aluminium right angle bolted into the inside corners using hex bolts and hurricane nuts to construct the removable cargo box. I doubled the thickness on the top lip to increase stiffness. On the rear I am waiting on some elastic netting I bought that will be screwed to the three sides of the small rear panel to act as a stuff space for frequently used items that you might not want to leave in the main tray. You can also see the music case latches I am using to attach the box to the tray. 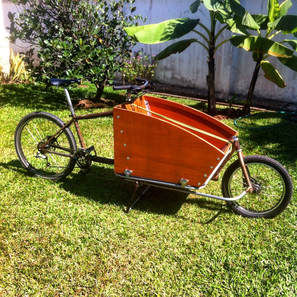
|
UPDATE: I've just finished some extra work on the bike and thought i'd update the page. The bike is now painted, has mud guards and a rack. I've created a shade structure and a rain cover for the cargo box too.
UPDATE: I pulled some spare 12v audio equipment out of an old car that I owned and decided to combine my interests of audio design and cargo biking to make this mobile sound system. It has the same clip pattern as the other accessories for the bike so can simply by taken on and off in a few minutes. It runs off a 65AH deep cycle AGM battery and can provide music at full tilt for about 5 hrs before needing to be recharged. Here is a video of it in parked- stage mode. When you are on the move the top speaker that sits on the rear rack re-attaches to the front box area using more of the music case clips.
